Me

My name is Jason Carrow and I'm currently working at John Cabot sixth form, this is my blog where I will be posting all of my research notes and assignments for my Product Design A-level class.


Monday 24 February 2014


Anodising
Anodising is an electrolytic passivation process. Anodising is done through positive and negative charge, the cathode's material is transferred to the anode creating a thicker oxide layer on the surface of the metal. This is so that it has increased corrosion resistance and wear resistance, and provides a better surface adhesive for paint primers.

The positive electrode called the anode is the material that is to be treated as it attracts all of the wanted material, and the cathode, the negative electrode attracts all of the unwanted material. The thickness of the oxide layer is determined by the amount of time you leave the anode in there for and the current per unit area.

Electro-plating
Electrolysis is used to electroplate objects. This is useful for coating a cheap metal with a more expensive one, such as copper or silver.

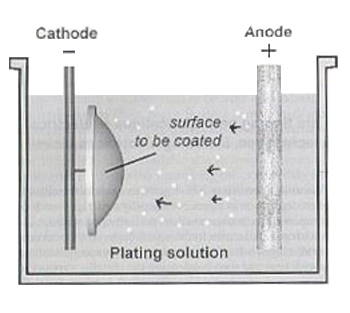
The negative electrode should be the object that you want to be electroplated.
The positive electrode should be the metal that you want to coat the object with

The electrolyte should be the solution of the coating metal, such as its metal nitrate or sulfate.

The object to be plated is connected to the negative terminal of the power supply, A piece of copper is connected to the positive terminal. The electrolyte is copper sulfate solution

Thursday 16 January 2014

Metals theory

Iron
Iron is converted from its ore by putting it into a furnace and removing the oxygen that is mixed within the ore, this is a process called smelting. This is done by putting the charcoal into the furnace which produces the heat you need to start the reaction by reacting with the oxygen from the ore. The impurities in the ore will form a later of slag. When removed, you are left with a greyish metal once it has cooled. Iron is often combined with carbon giving it a greater strength. By doing this, you are left with a combined material called steel.

Steel
Steel is an alloy of iron and a small amount of carbon. Carbon has  between 0.002% and 2.1%Carbon, Too little content of carbon content leaves the iron quite soft, ductile and weak. Carbon contents higher than those of steel make an alloyed that is brittle but not malleable. Also, alloying steel with other metals creates properties such as increased toughness and resistance to corrosion.

Carbon
Carbon can create Coal and diamond; they have different structures because of the pressure that is applied on them. The amount of carbon in steel increases the strength and hardness, but adding to much carbon can cause the metal to become brittle and break easily.


Iron & Carbon
Iron is normally soft and ductile, which alone, doesn’t make it a useful material to use. When you add carbon in a mixture with the iron, the characteristics are enhanced and the properties change, this can be good but bad in some ways. Increasing the amount of Carbon in the mixture can have different outcomes such as, The material will become a lot harder but the toughness reduces and can become brittle. Certain metals that have carbon in them can have their characteristics enhanced further by being heat treated, these include High carbon steel and medium carbon steel. The heat treating of the metal makes them become stronger, and harder.

Thursday 5 December 2013

Tanalising
Tanalising is simply the process of where a highly toxic blend of copper and arsenic is vacuum pressure impregnated into softwood and is used as a preservative. This treatment process ensures deep penetration into the timber cells, for a longer lasting protective result against fungal decay and insects than the application of a surface coating.

The stages of tanalising
1) The tanalising process involves placing the timber in to a treatment cylinder and creating a vacuum withing the timber vessels.

2) The cylinder is then flooded under vacuum with the preservative treatment

3) Hydraulic pressure is applied forcing the preservative deep into the timber and its cells

4) After a pre-determined period of pressure depending on the species of the timber being treated and its use, the treatment solution is pumped back into storage and a final vacuum extracts any excess treatment solution

5) Finally, low pressure inside the timber draws the surface solution when vented to the atmosphere and the treated timber is left for a specified period for fixation of preservative to occur.

Tanalised timber does not need any further maintenance treatment but will naturally weather over the months finally changing to a grey colour. This is caused by the effect of sun, moisture, wind and other exterior conditions. The timber will produce cracks  that will open and close as an effect of condition changes. They are not detrimental to the long term durability of the product.


Here are pictures illustrating the process of tanalising.

    tanalising process

Thursday 28 November 2013


Woodworking joints

Corner Mortise and tenon joint:


Corner mortise and tenon joints are used on tables and front legs or chairs where two rails are joined to a single legs at each corner. The end of the tenons are mitered where they meet inside the leg. The tenon is cut to fit the mortise hole exactly and usually has shoulders that seat when the joint fully enters the mortise hole. The joint may be glued, pinned, or wedged to lock it in place.


Forked mortise and tenon joint:

Forked mortise and tenon joints are found as the end of lock rails on large frame and panel doors. The gaps between the tenons should be no more than one third the width of the rail, this is so that it minimizes the amount of movement in them. The joint can be given extra strength by inserting a wedge at the end of the tenons.

Dowel joint:

Dowel joints can most commonly be found in factory made furniture E.G. When joining rails or 
feet to round legs, it is easier to use dowel joints over mortise and tenon joints. Using dowels in furniture ensures an accurate fit as it is easy to locate the hole and with 2 dowels inserted into the joint it makes it really accurate. Dowel joints are also good because they come in all varieties of size from 4-25mm and have a grooved surface so that the glue can flow easily along the dowel after being inserted into the hole.

Dovetail joint:
A dovetail joint is mostly used in the corners on the backs of drawers, the tapered shape of the tails resists the forces applied to the joints when the drawer is being used. Apart from being a strong joint it can also be used for decorative purposes and to make something look nice. Dovetails consist of one piece having the tails and the other piece having the pins that fit into the tails.


Finger joint: 

Finger joints are fairly easy to make as there are no dovetail styled angles involved in them. The large gluing gives the joint it's strength from each 'finger'. The finger joint can also be valuable when fixing tables and chairs and also can be used in such things as floor boards, timber roof and door construction. To visualize a finger joint simply interlock the fingers of your hands at a ninety degree angle


Steam bending processes


Steam bending

Steam bending is a woodworking technique where strips of wood are steam heated using a steam box. The applied heat and moisture makes it easy enough to bend the wood around a mould to create a shape. The moulding process is usually done putting the strips of wood in to a former, with the strips of wood often reinforced on the outside with a metal band to prevent the machine blowing out. Some examples of where you would use steam bending would be in the production of lacrosse sticks, violins and in manufactured wood furniture such as the Windsor chair. Steam bending can also be used to make big things such as the wood frame of a boat hull and lap boards.


Steam bending is also a low energy and economical method of manipulating wood. It doesn't need the expense or drying time of glues to join together several wood pieces to make the desired shape. Steam bending also leaves lower levels of scrap since a smaller piece can bent into shape instead of cutting the desired shape away from larger stock.Steam bending is limited in how much you can actually bend the wood without it breaking, especially for thick wood. Not all species of wood steam-bend well and problems can be that it weakens the wood slightly and can leave residual stresses which may cause breakage or spring-back over time.


Steamer 2
Steamer 1


After the wood has been steamed, it is to be taken out of the steam box and then placed straight into a former/jig. This is because the wood will contain a lot of moisture after steaming and will be easy to bend. If you put clamps on the jig with the steamed wood in it, it normally expels the moisture quicker and lets it dry faster. After you put it into the jig you clamp it together and wait until it dries. When you take it out it should have taken the shape of the jig. To help it dry faster you can also put it in a kiln to get rid of the moisture in the wood, you can use a variety of controls from temperature to air flow to get rid of some of the moisture and keep the desired amount of moisture in it.

Picture of CHOPSTICK Steamer and Bending Jig


Monday 11 November 2013


Manufactured boards

Plywood

Plywood is an engineered wood product made from thin sheets of wood veneer. It is commonly used instead of timber because of it strength and superior resistance to cracking, shrinkage, twisting and warping. Plywood, depending on how thick it is can be malleable, plywood comes in a range of thicknesses, from 6.5mm – 35mm. Plywood has multiple end uses including:
Skateboard ramps
Indoor furniture
Garage doors
House boats
Skateboards
Plywood can even be as a cement casting, this is normally made from shuttering plywood, a very cheap wood.


Hardboard

Hardboard also called high-density fibreboard is a type of fibreboard, which is an engineered wood product. It is similar to particle board and medium-density fibreboard but is a lot denser and stronger than it because it is made out of exploded wood fibres that have been heavily compressed. Hardboard can come in a range of thicknesses ranging from 3mm thick – 6.4mm thick.

Hardboard can be used for plenty of things such as:
Flooring
Furniture
Automobiles
Skateboard ramps
Clipboards


Chipboard

Chipboard, also known as particle board, is an engineered wood product manufactured from wood chips, sawmill shavings, or even saw dust, and a synthetic resin such as glue or other suitable binder, which is pressed and then extruded. Chipboard comes in 12mm –18mm thickness. There are plenty of things that chip board can be used in, these include:
Indoor furniture
Flooring
Counter tops
Doors
Packaging

Block board
Block board is a wood that is made up of loads of wooden block strips. The places are placed edge-to-edge and are compressed between wooden veneers while being glued. Block board usually comes in a 28mm- 30mm thick board. These are multiple uses for block board, these are:

Tables
Doors
Shelves
Panelling
Partitioning walls

Thursday 7 November 2013

The processes used to dry timber.


Seasoning of woods (reducing the moisture content)


Air drying:
Air drying is the process of drying the timber through exposing it to the air. The technique of air drying consists of making a stack of sawn timber separated by stickers, on raised foundations, in a cool, dry place. The rate that the wood is dries depends on the climate conditions and on air movement. For the wood to be dried successfully it has to be exposed to a continuous flow of air. The loss of moisture can be controlled by coating the planks of timber with a substance that is impermeable to moisture such as mineral oil.

 
Advantages – It can be less expensive to use this drying method and air drying often produces a higher quality of wood and the finished wood is more workable than the finished wood that comes out of kiln drying.

Disadvantages- Depending on the climate of the place you are drying the timber in, it takes several months up to a number of years to air dry the wood, and kiln drying can dry wood a lot quicker than this. Another disadvantage of air drying could be that the wood has to be put somewhere, which takes up space which could also cost some money for the company and that there is little to no control over the drying elements so drying degrade cannot be controlled. If air drying is done improperly and is exposed to sun, the rate of drying may be too quick and will cause the wood to crack and split, if it is done in winter, the opposite may happen and it may take too long to dry.

Kiln drying:
Kiln drying is done by introducing head to the wood. This can be done using natural gas or electricity, through steam heated machines. In this process you can control the temperature, the humidity and air circulation at various stages, the quality of the finished and dried wood that comes out of the kiln often depends on how you controlled each variable. In this machine the wood is stacked in chambers called wood drying kilns which each have equipment that helps it dry faster by increased air circulation and control of temperature. This process over comes the limitations introduced by the climate and weather conditions. In this process the timber can be dried to any moisture content, but in air drying, achieving a moisture content that is under 18% is difficult in most locations.
Here are some pictures of kilns and stacks of timber being put into them.
Advantages- Some advantages of kiln drying is that the temperatures that are introduced during kiln drying are above 60 C which kills of all the fungi and insects that are in the wood, this isn’t really guaranteed in air drying. Another advantage of kiln drying is that the time it takes to dry a load of timber is considerably less than that of air drying as the heat introduced during the process speeds it up rapidly. Also, in kiln drying you can control all of the variables such as moisture content, temperature and air circulation, so overall better control, you would not have much control over that in air drying.

Disadvantages – Depending on the species of wood you are trying to dry, overall is a lot more expensive than air drying, you also need to build the kiln or have it put in costing extra money. Also, as you can control the variables, some people may tune them at different levels and may dry the wood too quickly; this can also result in internal stresses such as splitting and warping.